
Mixing concrete is easy to make look simple. Put dry material and water into a wheelbarrow or mixer, turn it over until it looks smooth, then pour. That approach can be enough for a small, non-critical task when a preblended bag gives clear instructions. It becomes unreliable as soon as the pour is larger, the concrete must be consistent from load to load, the aggregate is variable, or a crew is waiting for material.
The practical aim is not to make a mix that merely looks wet enough. It is to produce fresh concrete that can be placed and compacted as intended, without adding uncontrolled water or losing track of what went into the batch. For one small repair, the bag manufacturer’s directions may be the whole plan. For repeated production, the plan has to include material measurement, loading order, mixing action, discharge, cleaning and a way to recognise when the batch is changing.
This guide starts with small-batch methods because that is where many people begin. It then explains what changes when you move to a drum mixer, a forced mixer, or an integrated batching system. It is written for contractors, site supervisors, plant buyers and operators who need to decide whether a manual process is still adequate or whether the work now calls for controlled equipment.
Quick answer: use hand mixing only where the batch is genuinely small and the supplier’s instructions can be followed closely. Use a drum mixer when repeated small loads need less physical handling. Use a forced-action concrete mixer when the job depends on faster, more uniform mixing of designed concrete batches. Once aggregate storage, cement handling, recipe control and steady output all become part of the same job, the question is no longer just how to mix concrete; it is how to run a batching process.
Safety comes first: fresh concrete and wet cement are alkaline. They can irritate skin and may cause chemical burns after contact. Wear suitable eye protection, alkali-resistant gloves, long sleeves and waterproof boots, and remove contaminated clothing promptly. OSHA’s concrete safety guidance explains the main wet-concrete exposure controls.
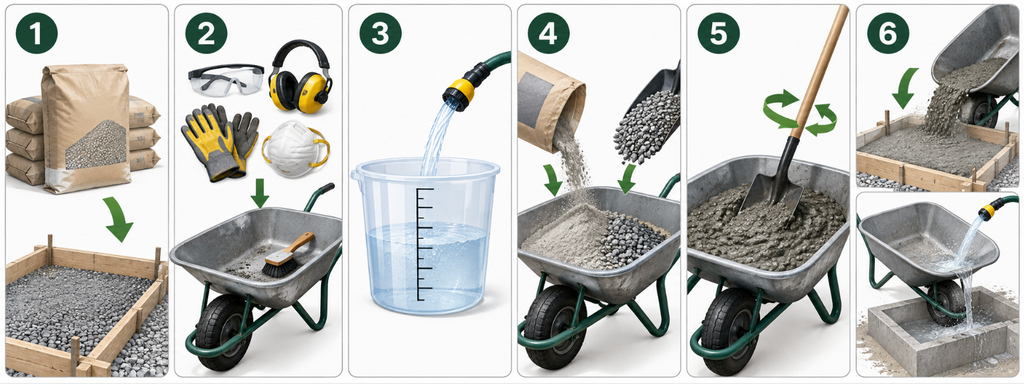
How to Mix Concrete in Six Steps
For a small pour using a labelled bagged product, this is the shortest responsible version of the process. It gives you the order of work without pretending that every bag, mix design or jobsite takes the same water quantity or mixing time. The product label or approved project procedure still controls those details.
- Confirm the material and the pour. Check that the bag or approved mix is correct for the job, calculate the amount required, and make sure the placement area, tools and receiving route are ready before opening anything.
- Prepare a clean, safe mixing area. Use a clean wheelbarrow, tray or mixer; put on suitable PPE; keep dry material away from standing water; and have a measured water container ready rather than relying on a hose nozzle.
- Measure the water. Use the exact product instructions or approved batch procedure. Hold back water only when that procedure calls for staged addition; do not start with an arbitrary ratio from another mix.
- Add and combine the materials in the specified order. For bagged products, this is commonly part of the water followed by dry material and the remaining measured water, but the named product’s directions take priority. For designed concrete, follow the approved loading sequence for that mixer and recipe.
- Mix until the batch is uniform. Break apart dry pockets, make sure aggregate is distributed, and use the required mixing duration for the equipment and material. A glossy surface alone is not a quality check.
- Inspect, place and clean promptly. Use the appropriate fresh-concrete check for the work, discharge or move the batch without unnecessary delay, then clean tools or equipment before residue hardens.
This six-step answer is enough for a genuinely small, straightforward batch. Move to the detailed sections below when the work involves repeated loads, specified concrete, mechanical mixing, bulk materials, quality records or a pour where one bad batch could disrupt the sequence.
Choose the Mixing Method Before Opening a Bag
The right method is set by the work, not by the tool that happens to be nearby. A small garden footing and a regular production run can both be called “mixing concrete,” yet they involve completely different risks. The first may be limited by physical effort and placement time. The second is usually limited by material flow, consistency, equipment uptime and the cost of a bad batch.
Start with three questions: How much concrete must be placed during the busiest part of the job? How consistent must each load be? What happens if the crew runs out of concrete, receives a wet batch, or waits while the mixer is cleaned? Those answers usually point to the method more clearly than the nominal size of a mixer.
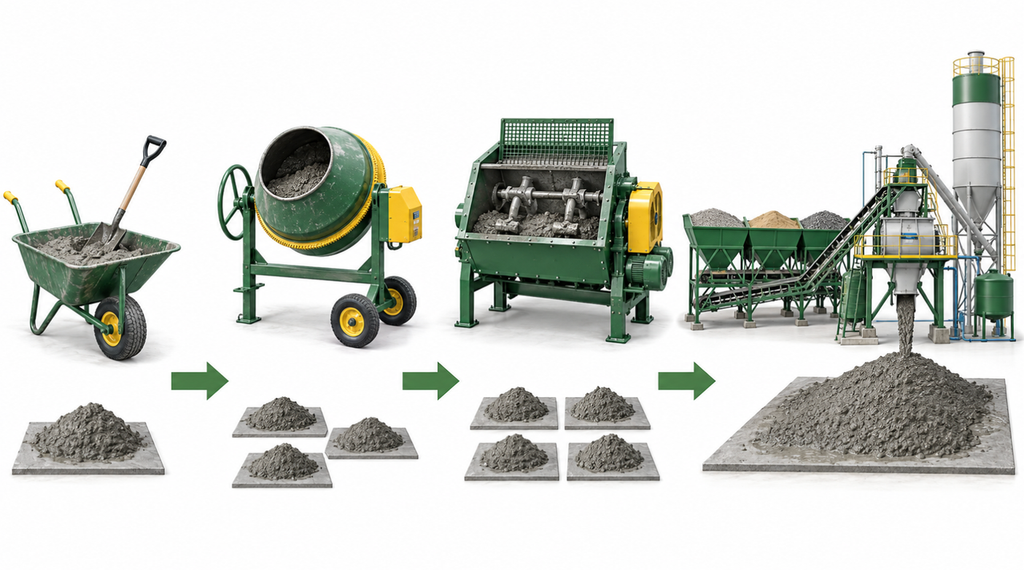
| Method | What happens during mixing | A sensible fit | Where it starts to break down |
| Hand mixing | Materials are combined in a wheelbarrow, mixing tray or similar container with hand tools | One small, manageable batch using a clearly labelled preblended product | Repeated batches, large aggregate, time-sensitive placement, or work that needs dependable uniformity |
| Small drum mixer | A rotating drum lifts and tumbles the load | Repeated small pours where a crew needs relief from hand mixing | When the available batch size, discharge rhythm or mixing action cannot keep pace with the work |
| Forced-action mixer | Paddles or arms move through the material inside a fixed pan or twin-shaft chamber | Controlled production, stiffer mixes, precast work and jobs that need repeatable batches | When the plant is missing dependable measurement, material supply or a workable site layout |
| Batching plant with mixer | Aggregates, cementitious materials, water and admixtures are stored, measured, transferred and mixed as a coordinated system | Regular production, multiple recipes, large sites, ready-mix or precast operations | When the volume is too irregular to recover installation, operation and maintenance costs |
The table is not a hierarchy in which the last option is automatically better. A batching plant is unnecessary for a few small pours; a wheelbarrow is a poor substitute for a system expected to deliver the same designed concrete throughout a shift. Hand tools and small mixers suit limited work, while automatic mixers are ideal for large-scale concrete projects. The useful decision is the narrowest method that can reliably meet the placement plan and quality requirements.
Concrete, Cement and Mortar Are Not Interchangeable
Many mixing mistakes begin with the language. Cement is the powdery binding agent. Concrete is the finished fresh mixture of cementitious binder, water, fine aggregate, coarse aggregate and, where specified, admixtures or supplementary materials. Mortar normally uses cementitious binder, sand and water, but does not contain the coarse aggregate that concrete does. A mixer chosen for mortar work, or a recipe intended for mortar, cannot simply be assumed to suit structural concrete.
This matters because water is not there merely to make the mix easier to move. The amount of mixing water relative to cementitious material affects the fresh and hardened properties of concrete. The American Cement Association explains that water-cement ratio is calculated by mass and that a concrete mixture must retain enough workability for placement, consolidation and curing. In general, a lower water-cement ratio produces stronger concrete if workability remains adequate. That is why a generic internet ratio is not a substitute for a project mix design, a bag label or the instructions issued by the responsible engineer or material supplier.
For a small job, use a product designed for that application and follow its labelled water range. For commercial work, start from the approved mix design and the actual materials on site. A remembered ratio from a different project is not a sound basis for changing that design. A commonly cited standard mix ratio is 1 part cement, 2 parts sand, 3 parts aggregates, but the correct concrete mix ratio depends on the approved design because incorrect proportions can significantly weaken structural strength.
Treat Mixer Capacity as a Production Question
A mixer’s overall vessel volume is not automatically the concrete you can make in one useful batch. Some small mixers can handle up to 24 gallons of material, but usable batch output still depends on loading, discharge, and mix condition. Feed capacity, discharge capacity, aggregate size, the material’s workability, the required mixing action and the time needed to load and discharge all affect real output. The site also needs enough room for materials to arrive, be stored and move without blocking the loading or pouring sequence, especially on larger projects.
That distinction is important when comparing TXMixing concrete mixer options. A model name or a large figure in a brochure is only the start of the conversation. Ask what the stated figure represents, which mix it assumes, what aggregate size it permits, how the batch is loaded, and whether the complete workflow can supply the next load without interrupting the current pour.
Start With the Material and the Pouring Plan
Good mixing begins before the drum turns. The crew needs to know what material is being mixed, how much must be placed, where the concrete will go, who is receiving it and how the equipment will be cleaned afterward. Skipping this preparation is how a simple mixing task turns into a stop-start operation with inconsistent batches and a rushed final load.
The preparation should be proportionate to the work. You do not need a full plant-control system to mix one bag, but you do need a clean container, measured water, the correct bag and a clear place to put the finished material. At production scale, the same discipline becomes a documented sequence: check stock, check the approved recipe, confirm aggregate condition, verify water measurement, prepare the mixer, coordinate transport and make sure no one is improvising a material substitution halfway through a pour.
| Before mixing | What to establish | Why it changes the result |
| Concrete specification | The approved mix design, product label or supplier instructions for the exact material | It defines the materials, water range and intended use; a similar-looking mix may not have the same requirements |
| Required placed volume | The actual pour volume, pour sequence and expected peak demand | It determines whether one batch method can keep up without cold joints or repeated delays |
| Aggregate condition | Nominal size, cleanliness, moisture condition and whether different stockpiles are being used | Aggregate moisture changes the water already entering the mix, while oversized or contaminated aggregate can affect equipment and fresh concrete |
| Water | A measured source and a defined method for adding it | A hose held over a mixer makes repeatability difficult; small, unrecorded additions accumulate across batches |
| Equipment condition | Clean mixing chamber, sound paddles or drum, working discharge, guarding and safe access | Old hardened material reduces useful volume and can change how a fresh batch moves through the mixer |
| Placement and cleanout | Who receives the concrete, where washout is managed and when the equipment must be ready again | Concrete that sits waiting or equipment left to harden creates a larger problem than a slow start |
The most useful habit is to separate material facts from assumptions. A fact might be the labelled dosage range for a bagged product, the approved design water quantity, or the maximum aggregate stated by the mixer manufacturer. An assumption might be that today’s sand is as dry as last week’s, that a larger drum means a larger useful batch, or that a hose operator will add the same amount of water every time. Record and check the first group; do not build production around the second.
Plan the Pour, Not Just the Batch
Concrete has to be mixed in a way that supports placement. A batch that looks acceptable in the mixer may still be wrong for the job if the next batch arrives late, the crew cannot consolidate it in time, or the access route leaves it standing while people decide where to put it. For a short run of small batches, calculate the work backwards from the placement sequence: the receiving area, the number of people needed, the travel distance from mixer to pour, the expected discharge rhythm and the final cleanout. Plan the sequence so poured concrete is placed without segregation, which helps maintain structural integrity.
On a larger site, the plant plan also needs to account for loader movement, aggregate replenishment, cement delivery, dust management, water supply, power, truck circulation and maintenance access. The concrete batching plant overview is the relevant next step when those activities must work together. A mixer is one part of that system; it does not by itself solve the material-handling problem around it.
Do Not Use a Universal Recipe—Use the Correct Concrete Mix Ratio for Different Concrete Jobs
There is no responsible one-line answer to “what ratio should I use?” without knowing the application, required strength, exposure, aggregate grading, workability, cementitious materials, admixtures and local requirements. Bagged concrete is formulated as a product, so its manufacturer tells you how much water to add. Specified concrete is formulated as a mix design, so the project documents and material supplier control the recipe.
This is also why adding water to make a reluctant batch “flow better” can be a costly shortcut. It can change the intended water-cement ratio, alter segregation risk and leave the crew with a mixture that is easier to move but no longer matches the design. If workability changes unexpectedly, pause long enough to identify the cause. Check the measured water, aggregate moisture, loading sequence, time since mixing began, material identity and any authorised admixture procedure before changing the batch.
How to Mix Concrete by Hand Mixing for a Small Batch
Hand mixing remains useful for small repairs, isolated posts, a small pad or another limited task where the volume is modest and the product instructions are clear. It is not a badge of efficiency. Once the same crew is mixing batch after batch, physical fatigue and inconsistent water additions become part of the quality risk. At that point, a small mixer may be the safer and more economical choice even before the site needs a complete batching system.
The following method is deliberately written around labelled bagged concrete or an approved small-batch recipe. It does not prescribe a universal water quantity. The exact quantity must come from the material supplier or mix design. For example, product-specific guides such as QUIKRETE’s hand-mixing instructions give water amounts for a named product and warn against adding more water than required. That is the right principle: use the directions that match the material in front of you.
Set Up a Clean, Safe Mixing Area
Choose a level area close enough to the pour that you will not spend the working time carrying heavy fresh concrete across the site. Keep dry bags and tools clear of standing water. Place a clean wheelbarrow, mixing tray or mortar pan where it will not roll or rock. Have the measured water, a hoe or shovel, a stiff brush and the placement tools ready before opening the material.
Avoid mixing on bare soil where dirt, leaves or loose stones can be pulled into the batch. The point is not to create a perfect laboratory; it is to avoid introducing random material that changes the batch or makes cleanup harder. If the job will need several loads, prepare a consistent measuring container for water rather than relying on a hose nozzle and memory.
Read the Exact Product Instructions
Check the product name, intended application, stated water range and any limits on mixing, placing or curing. For example, a standard 40-pound bagged concrete mix yields about 0.30 cubic feet, which helps with estimating volume on small jobs. A fast-setting repair product, a standard concrete mix and a mortar mix do not necessarily follow the same sequence. Confirm that the bag is dry, within any stated storage period and free of hardened lumps before it reaches the mixing area, since expired or impure materials can reduce concrete quality.
For a specified project mix, the equivalent step is reviewing the approved batching information. The operator needs the current recipe, authorised material substitutions if any, and the expected water adjustment process. A crew should never discover after the pour begins that one person was working from a different design sheet.
Add Water in a Controlled Way
Use the measured amount specified for the material, holding back any portion only when the supplier’s directions call for staged addition. When staged addition is allowed, slowly add the measured water instead of dumping it in at once, starting with about three quarters and then adding the remaining water only as needed to reach the intended consistency. Adding water gradually does not mean adding extra water freely. It means keeping the final amount under control, and adding one extra quart of recommended water can reduce concrete strength by up to 40%. Prevent excess water from being added after mixing begins, since it reduces concrete strength.
When sand, stone or other ingredients are measured separately, moisture correction becomes especially important. Damp aggregate already carries water into the mix. A batch prepared with the same measured water as a dry-aggregate batch may therefore become too wet. For work where this matters, do not guess at a correction; use the project’s batching procedure and the site’s actual moisture-control method.
Combine the Dry Material Thoroughly
Add the dry concrete mix in manageable portions and fold it through the water from the outside toward the centre. Use the hoe or shovel to break apart dry pockets at the base and edges. Turn the mixture repeatedly until the coarse aggregate is distributed; thorough mixing is what makes the batch well mixed and evenly distributes sand and gravel. The goal is complete wetting and even distribution, not simply making the upper surface look uniform, but producing a fully integrated batch.
If you are mixing separate ingredients from an approved recipe, dry blending may be required before or during water addition depending on that recipe and equipment method. Follow the specified loading sequence. Do not copy a sequence from a bagged-mix tutorial onto a designed concrete batch without confirming it applies.

Check Workability Without Chasing a Glossy Surface
A workable fresh mix should hold together while allowing placement and consolidation for the task, with a workable consistency that reaches the desired consistency for placing and consolidation. For a small batch, it should look more like thick oatmeal than soup. It should not be dry enough to crumble apart, but it also should not show a free layer of water or obvious separation of stone from paste. Too much water or excessive water makes the batch weaker and raises the risk of cracking. This is a practical field observation, not a substitute for a project’s specified tests.
For a small non-critical repair, compare the mixture with the product maker’s description and use it promptly. For controlled concrete production, workability needs to be assessed through the quality procedure set for the job. A slump value, for example, is meaningful only when the test is performed correctly and compared with the specified target. Looking like the previous load is not evidence that a batch meets a structural requirement.
Place, Finish and Clean Up Before the Mix Hardens
Move the finished concrete promptly to the placement area. Do not use the wheelbarrow as a holding tank while the next decision is made. If the concrete is going into a form, place it without dropping it in a way that separates aggregate from paste. Place in a way that avoids throwing aggregate to one side, consolidate as the project requires, work out trapped air bubbles during consolidation, and protect the finish from being overworked with water at the surface.
Clean the wheelbarrow, tray and tools while the residue is still fresh. This is not merely housekeeping. Hardened concrete steals capacity from the next batch, contaminates the work area and makes every later mixing step slower. Manage washout responsibly according to the site and local requirements; do not allow cementitious residue to enter drains or waterways.
When Hand Mixing Stops Being the Sensible Option
Hand mixing should end when the method, rather than the concrete, becomes the limiting factor. It makes the most sense for small repairs and smaller projects, not ongoing or repeated concrete work. Common signs include a crew that cannot place one batch before the next must begin, visible differences between loads, workers adding water “by feel,” repeated lifting injuries or fatigue, and a job where a late load could compromise the pour sequence. These are not failures of effort. They are signals that the operation needs mechanical mixing and a more controlled material flow, and once output demand increases, a mixer is the better fit for larger projects and repeated concrete work.
How to Mix Concrete in a Drum or Forced Mixer
Mechanical mixing reduces manual labour, but it does not remove the need for control. A mixer can repeat the same mistake much faster than a wheelbarrow. The operator still needs a defined batch size, a verified loading sequence, measured water, appropriate mixing action and a clear route from discharge to placement.
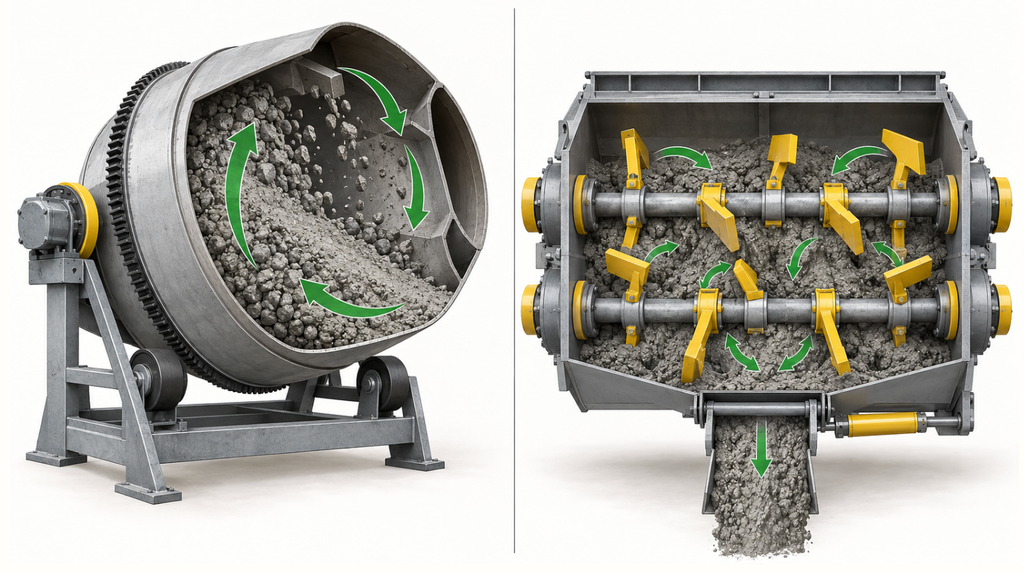
The first choice is between the kinds of mixing action. A drum mixer tumbles materials as the drum rotates. It can suit regular small-scale work where the mix is relatively conventional and the batch size matches the equipment. A forced mixer uses paddles or mixing arms to move materials through one another. That positive action is often preferred when the production process needs faster, more intensive and repeatable mixing, particularly for stiffer mixes or controlled plant output. Neither description removes the need to check the specific mixer, materials and procedure.
Prepare the Mixer for a Real Batch, Not a Demonstration Batch
Before loading, inspect the drum or mixing chamber, paddles or blades, discharge gate, guards, power supply and surrounding access. Remove loose hardened material safely according to the manufacturer’s maintenance procedure. Do not reach into a mixer while it is energised or moving. Make sure the discharge area is clear and the receiving wheelbarrow, bucket, skip or truck is ready before the mixer begins.
Then set the batch quantity. Do not fill a mixer simply because there is physical room left in the drum. Overfilling reduces the mixer’s ability to move material through the intended action and can leave dry pockets, discharge problems or unnecessary stress on components. Underfilling can also be inefficient if it forces excessive cycles for the pour. For example, a compact mixer may be fine for a few small runs, while larger projects can justify higher-capacity equipment or automatic loading; a paddle mixer may help with a very small contained batch, but it is not a substitute for a proper concrete mixer for repeated site work. Use the manufacturer’s stated usable capacity as a starting point, then verify the right batch size against the concrete design, aggregate size and actual site process.
Use a Defined Loading Sequence
The correct loading order depends on the mixer type, material system and approved batching procedure. Many bagged-product instructions call for part of the water before the dry material; other plant procedures may stage aggregate, cementitious materials, water and admixtures in a controlled sequence. The safe rule is not “always add water first” or “always add dry material first.” The safe rule is to follow the procedure that has been established for the exact product and equipment.
For any repeated process, write the sequence down where the operator can see it. A typical controlled batch workflow contains the following stages:
- Confirm the approved recipe, material identities and target batch size.
- Check that the mixer is clean, safe and ready to discharge.
- Measure each material using the method intended for that operation rather than approximating by shovel count.
- Load the materials in the specified order, adding any authorised initial water only where the procedure calls for it, then introducing the remaining water and any admixtures in the approved sequence.
- Mix for the validated duration for that equipment and mix design, aiming for a well mixed batch rather than one diluted for easier discharge.
- Check the batch through the project’s fresh-concrete procedure before release where quality control is required.
- Discharge fully, place or transfer without delay, and prepare the mixer for the next batch.
The sequence is simple on paper, but each stage protects the next one. A change in water at stage four can invalidate a later workability check. A poor discharge can leave part of the batch in the mixer and distort the next load. A rushed washout can turn into hardened build-up that changes the next day’s usable capacity.
Do Not Borrow Mixing Times From a Different Mixer or Product
Mixing time is not a universal number. It varies with mixer action, batch volume, the materials, aggregate grading, moisture, admixtures and the point at which “mixing begins” is defined. A small bagged-mix guide may specify a few minutes in a small drum, but that cannot be copied onto a forced mixer operating a controlled batch. Similarly, a mixer brochure’s production figure cannot substitute for a validated mixing and discharge cycle on site.
The defensible approach is to develop or follow the project procedure: establish a mix time for the specified materials and equipment, verify fresh properties using the required test plan, and document changes that affect the result. If the concrete becomes less workable during a shift, investigate why before lengthening the mix or adding water. The reason might be aggregate moisture, changed material, temperature, delivery timing, equipment condition or an unauthorised change in loading.
Know What the Mixer Is Doing to the Material
A drum mixer relies largely on lifting and tumbling. Its performance depends on drum speed, blade condition, batch volume and the material’s ability to circulate. During transport, truck or transit drums should turn at low speed to help preserve workability and reduce segregation before discharge. A forced mixer creates a more direct shearing and folding action through paddles or arms. In either case, the operator should be able to answer a basic question: is every part of the batch being mixed, or are some materials riding around the chamber without being incorporated?
Look for persistent dry pockets, balls of cementitious material, aggregate gathering in one zone, material clinging to worn blades, or discharge that starts with a different consistency from the end of the same batch. These conditions need investigation. They are not corrected by simply running the mixer longer without understanding the cause.
For a site moving into controlled mixing, TXMixing’s JS500 concrete mixer illustrates the level of product data that should be reviewed. TXMixing lists a 0.5 m3 / 500 L discharge capacity, 0.8 m3 feed capacity and 18.5 kW mixing power. Those figures are selection inputs, not a promise of one fixed output for every concrete recipe. The buyer still needs to confirm the actual aggregate, the current aggregate-size limit for the chosen configuration, batch process, power and expected production rhythm.
The same product page describes the JS500 as a twin-shaft forced mixer that can operate independently or alongside a PLD batching unit in a simple batching arrangement. That distinction is useful because it shows what a growing job gains when it moves beyond hand-loaded ingredients: aggregate can be measured before it reaches the mixer, the loading sequence can be repeated, and the operator has a clearer point at which to control each batch. It is not a preset solution for every site. The selected PLD unit, cement supply, water control, discharge route and controls still have to match the project.
Keep Water, Admixtures and Moisture Corrections Visible
The easiest variable to lose is water. It can enter from a measured tank, a hand-held hose, wet aggregate, mixer wash residue, an admixture solution or a well-intentioned worker trying to make a stiff batch easier to handle. In general, using less water within the approved range helps achieve stronger concrete. Too much water can leave the hardened mix more porous and less strong. If the operation has no way to see and record those inputs, it has no dependable way to compare one batch with another.
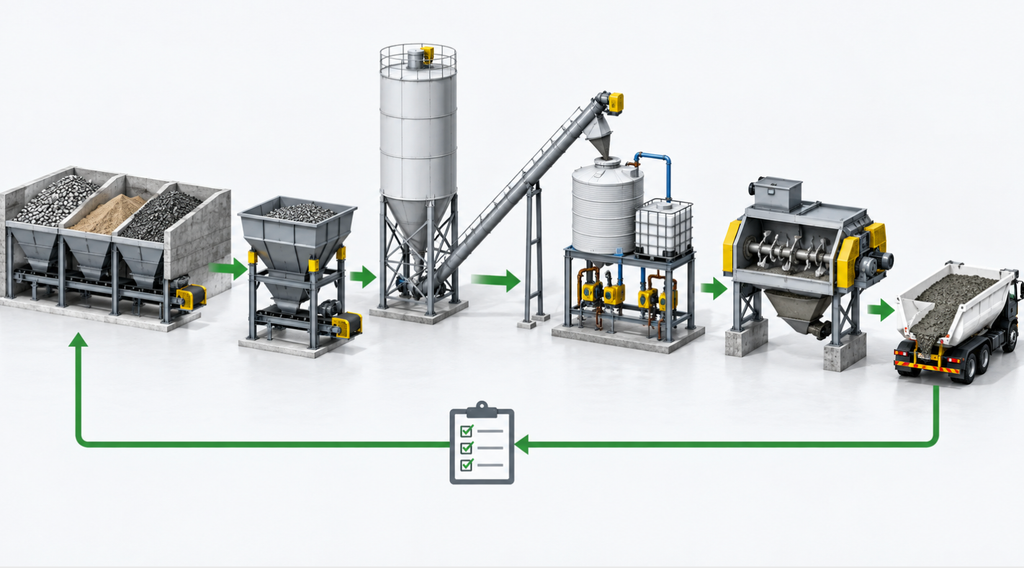
For controlled work, water should be measured, aggregate moisture should be handled through the established batching method, and admixtures should be dosed according to their approved instructions. A plant does not become consistent just because it has a mixer. It becomes consistent when the material inputs and mixing process are controlled together.
Discharge and Washout Are Part of Mixing
The batch is not complete until it has discharged in a usable condition. Check whether the discharge gate opens cleanly, whether material remains trapped in the chamber, and whether the receiving equipment can accept the full load without spillage or delay. A mixer that takes twice as long to discharge as expected may be the actual bottleneck, even when its mixing action is acceptable.
At the end of the run, clean according to the manufacturer’s operating and safety instructions. Plan water use and washout containment before production starts. Repeatedly leaving residue in a drum or forced mixer is not a harmless shortcut: it reduces volume, changes mixing action, makes maintenance harder and can send old, partially hardened material into a later batch.
Choose a Concrete Mixer for Repeatable Batches
Choosing a concrete mixer is a process-design decision. The buyer is not only buying a chamber and motor. They are choosing how aggregate, cementitious materials, water and finished concrete will move across the site. A mixer that looks suitable in isolation can become frustrating when it is connected to the wrong aggregate feeder, undersized power supply, inaccessible silo, poor washout plan or a production target that assumes every cycle will be perfect.
Begin with the job, then work toward the equipment. Estimate the largest continuous placement demand rather than using only total project volume. A project may contain thousands of cubic metres of concrete but place it in occasional, manageable pours. Another project may have a smaller total volume but require a concentrated daily output that creates a harder demand on the mixer and materials system.
Work From the Required Placing Rhythm
Ask how much concrete must reach the placing point during the busiest hour, how long the crew can wait between loads, and how many different mixes must be made in a shift. Then include loading, mixing, discharge, transfer, cleanup and ordinary interruptions. This produces a more realistic planning number than dividing a theoretical hourly output by a shift length.
A useful conversation with a supplier sounds like this: “We need to place this volume during this window, using this aggregate, with this power supply and this site layout.” It does not sound like: “We need the largest mixer that fits our budget.” The first version gives the supplier enough information to discuss a complete process. The second often produces a nominal capacity that will not match the site.
Match Mixer Action to the Concrete and the Workflow
| Mixer action | Concrete / material | Workflow fit | What to consider |
| Hand mixing | Small amounts of conventional concrete or repair material | Occasional, low-volume work where equipment access is limited | Labor, consistency and batch size |
| Drum mixing | General-purpose concrete with normal aggregate | Repeated batches on typical construction sites | Drum capacity, loading sequence, mixing time and discharge |
| Forced action | Stiff mixes, fibre mixes, mortar and other demanding materials | Controlled, repeatable production where thorough mixing matters | Power, blade wear, maintenance and material characteristics |
The table should narrow the selection, not replace technical review. Before ordering, send the supplier the information that changes the duty. It is far more useful than asking a broad question about “the best concrete mixer.”
Check Capacity Figures in Context
Published data becomes useful only when the terms are clear. TXMixing lists the JS750 with a 750 L / 0.75 m3 discharge capacity, 1,200 L feed capacity and 30 kW mixing power on its JS750 product page. This gives a buyer a basis for technical discussion, but it does not create a universal hourly production promise. Aggregate limits, available options and the duty conditions for the chosen configuration should be confirmed in the current product documentation.
Before treating a capacity figure as a site result, confirm:
- whether the figure refers to feed volume, discharge volume or theoretical throughput;
- which aggregate size and mix condition it assumes;
- how materials are loaded and how long discharge takes;
- whether water and admixtures are measured within the process;
- which power supply and control arrangement are required;
- what routine inspection, blade replacement and spare parts support are expected;
- whether the transfer route can receive each discharged batch without delay.
This approach sounds more careful because it is. A capacity figure is a product property. Reliable output is a property of the whole operating system.
Build the Material-Handling Chain Around the Mixer
A forced mixer may be the centre of the process, but it needs the right supporting equipment. Aggregate must arrive in a controlled quantity. Cementitious material must be protected, stored and transferred. Water must be available and measured. The finished mix must have a clear route to a truck, skip, bucket, mould or placing point.
For a growing operation, that chain may include a concrete batching machine for aggregate measurement, a cement silo for bulk cement storage and a screw conveyor for transferring powder, usually Portland cement, to the weighing or mixing stage, where it hardens through hydration into a solid mass. These are not optional accessories to add because they look complete in a layout drawing. Each one solves a specific material-flow problem. The buyer should confirm its capacity, interface, access for maintenance and suitability for the selected plant configuration.
Ask for the Information That Makes a Quote Useful
When requesting a mixer or a larger system, provide the following information. It allows the supplier to propose equipment against the job rather than against a vague label.
- Concrete types and approved mix designs, including any special materials or fibres.
- Required placed volume per hour during peak activity and expected production days per week.
- Desired batch volume and whether the work requires one mix or frequent recipe changes.
- Aggregate sizes, grading, shape, expected moisture variation and storage method.
- Cementitious materials, bulk-bag or silo supply, and any powder-handling constraints.
- Water source, water-measurement requirement and admixture-dosing needs.
- Available electrical supply, site access, lifting limits, headroom and foundation or mobility constraints.
- Discharge method, transport distance to placement and receiving equipment.
- Dust control, washout, wastewater handling and site-specific environmental requirements.
- Required controls, batch records, operator training, documentation, spare parts and maintenance expectations.
A credible equipment discussion should also include what the supplier needs to verify. That keeps a proposal tied to real material and operating conditions rather than a generic product description.
Read the Mix Before It Becomes a Pouring Problem
Fresh concrete gives the operator clues. A change in appearance, movement or discharge can show up before the problem reaches the formwork. The mistake is to treat every clue as a reason to add water. Good operators first ask what changed in the inputs or process, then use the project’s quality procedure to decide the response.
Visual inspection is useful, but it has limits. It can reveal dry pockets, separation, unblended material or an obvious change from earlier batches. It cannot confirm compressive strength, air content, slump compliance or durability by itself. Where those properties matter, follow the specified sampling and testing plan instead of relying on appearance.
| What you notice | Plausible process causes to investigate | A more controlled response |
| Mix is dry, harsh or difficult to discharge | Water measurement error, drier aggregate than expected, incorrect material, insufficient mixing action, delayed discharge | Check the approved water and moisture process, material identity and mixer condition before changing the batch |
| Free water, paste wash or aggregate separation | Excess water, changed aggregate moisture, overhandling, wrong loading sequence or unsuitable material condition | Stop treating the symptom with more mixing; compare measured inputs and the project’s acceptance procedure |
| Persistent balls or dry pockets | Poor loading sequence, overfilled mixer, worn paddles/blades, unsuitable batch size or incomplete material circulation | Inspect the mixer, confirm batch loading and validate that all material is moving through the mixing zone |
| Output varies batch to batch | Hand-added water, inconsistent aggregate, changing batch size, no repeatable timing or partial residue in the mixer | Standardise measurement, record changes and clean/inspect equipment between runs as required |
| Discharge slows or leaves residue | Build-up, wear, gate issue, batch too large, material bridging or a receiving-route delay | Isolate the cause safely, inspect the discharge system and do not hide the issue by forcing the next batch through |
| Material suddenly changes during a shift | New aggregate stockpile, altered moisture, different bag/product, temperature or unauthorised adjustment | Treat it as a process change, not a cosmetic variation; check source, records and project procedures |
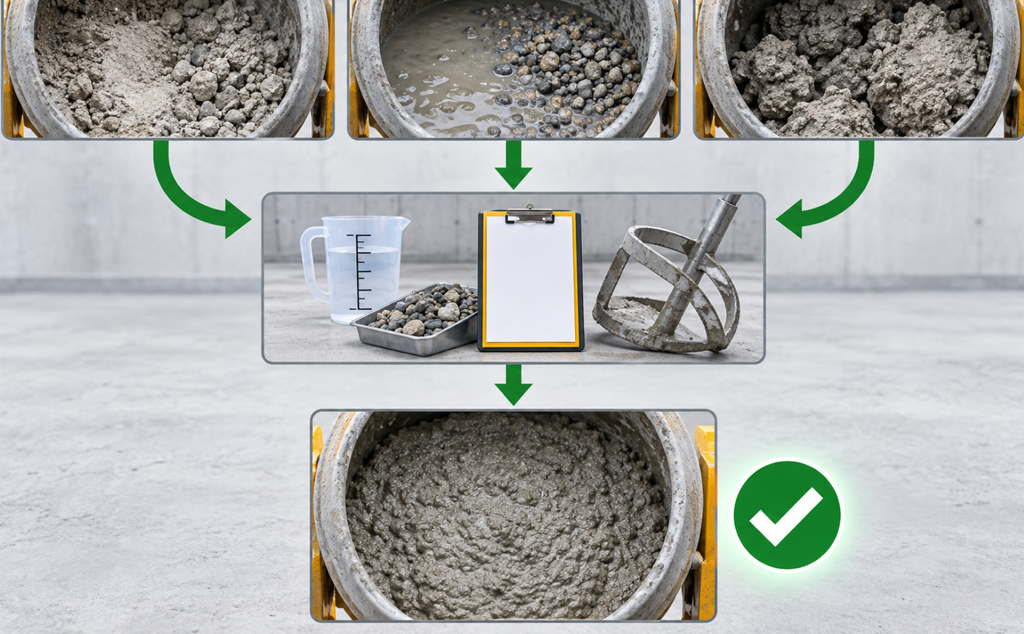
If a batch is outside the agreed limits, use the project’s hold, test, adjustment or rejection procedure. A mixer operator should be empowered to flag an unusual batch before it reaches placement, especially where the work is structural, customer-facing or part of a documented quality system.
Separate Workability From Strength Claims
Workability describes how the fresh concrete handles during mixing, placing and consolidation. Strength is determined later through the specified mixture, curing and testing process. A wetter-looking mix may feel easier to place, but that observation does not establish its strength. More reliable results come from the approved mix and water control, not from making the batch wetter to achieve easier handling. Likewise, a stiff mix is not automatically stronger or better for every application.
This distinction is worth making on every site because it protects both the operator and the project. The operator’s job is to follow the approved batching and mixing procedure, identify deviations and communicate them. The job of design acceptance belongs to the responsible quality and engineering process. Keeping those roles clear prevents a rushed visual decision from becoming an undocumented change to the concrete.
Keep a Short Batch Record When Repetition Matters
The record does not have to be elaborate for every small task. For repeated commercial batches, however, a short, practical record is one of the best troubleshooting tools available. Note the date and batch time, recipe or product identity, aggregate source or condition, measured water, admixtures, operator, observed issues and any test reference required by the project. When a problem appears, this creates a trail back to the relevant change.
Records also help the equipment team. If a discharge issue only occurs after several batches, if a particular material bridges in a hopper, or if certain aggregate conditions increase mixing time, maintenance and operations can work from evidence instead of recollection. This is where a process becomes more reliable without becoming bureaucratic.
When a Mixer Should Become a Batching Plant
There is a point where buying a larger mixer does not solve the job. If the real problem is inconsistent aggregate measurement, unreliable cement supply, hand-added water, multiple mix designs, traffic around the mixer or a shortage of storage, then the operation has outgrown a stand-alone mixing step. It needs coordinated batching.
A concrete batching plant combines material storage, measurement, transfer, mixing and controls so that the ingredients reach the mixer in a defined sequence. The appropriate layout depends on whether the site is permanent, how much material it must hold, how often recipes change, whether trucks or skips receive the concrete, and what civil, power and environmental constraints apply.
The Signs That a Stand-Alone Mixer Is No Longer Enough
Consider a batching system when several of the following conditions are true:
- The job needs consistent concrete across many batches or several days of production.
- Aggregate has multiple fractions that need measured proportioning rather than loader-bucket approximation.
- Bulk cement, multiple silos, powder transfer or admixture dosing has become part of normal work.
- The site needs batch records, recipe changes, repeatable water measurement or customer traceability.
- The mixer waits for materials, while loaders or workers wait for the mixer, creating a queue through the whole site.
- Output needs to be sustained through a shift rather than achieved in occasional short runs.
- The operation serves remote work, precast production, ready mixed concrete supply, ready-mix dispatch or an infrastructure project with a clear production plan.
None of these signs requires a specific model by itself. Together, they show that the bottleneck is not simply mixing action. It is the way materials and information move through the site.
Mobile and Stationary Layouts Solve Different Problems
A mobile arrangement is usually considered when relocation, fast deployment or limited permanent civil work is part of the project. It still needs a realistic plan for transport, ground conditions, aggregate storage, power, water, commissioning and the route through which concrete leaves the plant. Mobility does not cancel the need for capacity and quality control.
A stationary layout can make more sense when the operation has a long horizon, higher storage requirements, frequent material deliveries, larger truck circulation needs or repeated production at one yard. The civil commitment may be greater, but the layout can be designed around sustained material flow rather than repeated relocation.
For a relocation-focused project, see TXMixing’s guide to mobile concrete batching plants. For a broader explanation of plant components and the questions that affect a fixed installation, read the concrete batching plant ultimate guide. The useful next step is to compare the project’s actual duration, output requirement and logistics with the available site, not to treat “mobile” or “stationary” as a quality ranking.
Make the Final Decision on the Whole Process
The final choice should leave you with a complete answer to five practical questions:
Can the system make the approved concrete with the actual site materials?
Can it deliver each batch at the pace the placement crew needs?
Can the operation control water, aggregate, powder and recipe changes well enough for the work?
Can the site feed, clean, maintain and move around the system safely?
Can the supplier document what the chosen configuration includes, what it assumes and what the buyer must provide?
If those answers are clear, the equipment choice is grounded in the project. If they are still vague, return to the material and pour plan before choosing a model. The best mixer is not the one with the most impressive isolated figure; it is the one that fits a working process from material delivery through discharge and cleanup.
Questions Often Asked About Mixing Concrete
Can I add water after the concrete has started mixing?
Only follow an authorised procedure for the exact product or approved mix design. An unmeasured late addition can change the intended water-cement ratio and make successive batches inconsistent. Do not add too much water once mixing starts, because excess late water can sharply reduce strength. The label or approved procedure may require only part of the water at first, with the rest added in sequence. For bagged material, follow the manufacturer’s labelled directions. For specified concrete, use the project’s quality-control process rather than an on-the-spot visual correction.
Is a drum mixer or a forced mixer better for concrete?
They serve different processes. A drum mixer can work well for repeated small batches where tumbling action and a simple workflow are sufficient. A forced mixer is often selected where the job needs more direct mixing action, tighter repeatability, stiffer mixes or integration with controlled batching. The right choice depends on the concrete, batch size, aggregate, production rhythm and site layout.
How do I know whether the batch is too large for the mixer?
Empty space at the top of the drum is not a reliable capacity measure. Check the manufacturer’s usable feed or discharge capacity, the required aggregate size, the specified material condition and how freely the load circulates and discharges. If the batch leaves dry pockets, mixes unevenly, spills, slows discharge or makes every cycle difficult to clean, revisit the batch size and process with the equipment supplier.
When should I choose a concrete batching plant instead of a mixer?
Choose a batching plant when dependable material measurement, bulk storage, several ingredients, repeated recipes, batch records or sustained output have become central to the job. A stand-alone mixer can be the right tool for limited work; an integrated plant is the better fit when the surrounding material-handling and control tasks are now the main source of risk or delay.
Mix for the Job You Actually Have
Concrete mixing becomes reliable when the method matches the job. For a small labelled bag, that means preparing a clean area, measuring water, following the product instructions, mixing thoroughly, keeping the concrete moist for at least 7 days during curing, and cleaning promptly. For a recurring operation, it means treating every batch as a controlled sequence of measured inputs, appropriate mixer action, visible checks and orderly discharge; basic safety tips still matter to help prevent skin, lung and eye irritation while mixing and pouring.
As production grows, do not expect a larger drum alone to solve problems caused by storage, aggregate proportioning, water control or site traffic. Build the system around the material flow and the placing plan. Start with the TXMixing concrete mixer range when the next step is repeatable mechanical mixing, then define the batching equipment around the actual materials, output and site constraints. That is how “mixing the concrete” becomes a process the crew can repeat with confidence, with cured concrete continuing to gain strength and typically reaching full strength after 28 days.