


You picture a small patio out back. Or maybe a row of fence posts. Halfway through the job, your arms burn and the pile looks wrong. That’s the moment you learn the truth: the mix matters more than the muscle.
Get the mix right, and your concrete can last for decades. Get it wrong, and it cracks, crumbles, or fails before the season ends.
Learning how to mix concrete comes down to three pillars: correct ratios, smart tips, and proven techniques. This guide walks you through each one, step by step, with basic tools. Whether you’re mixing concrete in a wheelbarrow or a rented drum, you’ll find clear guidance you can follow on your first pour. For bulk orders and local support, TXMixing is here to help.
The Four Concrete Ingredients
Every batch you mix comes down to four players: cement, sand, aggregate, and water. Each one has a job, and each one can ruin the pour if you get it wrong. Here’s the quick version from Practical Engineering:
| Ingredient | Role |
|---|---|
| Water | Drives the chemical reaction (hydration); affects workability and strength; becomes part of the cured concrete |
| Sand (fine aggregate) | Filler that makes up the bulk of the volume; reduces cost, increases strength, reduces shrinkage during curing |
| Gravel (coarse aggregate) | Filler that makes up the bulk of the volume; reduces cost, increases strength, reduces shrinkage during curing |
| Cement | Binder that turns the mix from a liquid to a solid through hydration; holds the other ingredients together |
Cement: The Binder
Think of cement as the glue. The University of Illinois materials science department describes concrete as a composite of filler and binder, where the cement paste glues the filler together into a synthetic conglomerate. Water mixed with cement forms that paste, and the paste hardens through hydration. The properties of this hardened paste control the properties of the finished concrete.
A good binder does more than stick things together, according to SealBond Chemicals. It bonds the aggregates so the concrete mixture supports itself as it sets. It provides long-run resistance to environmental stress, chemical attack, and loads. It also keeps the mix workable, so you can pour and shape it. Get the cement content wrong, and every one of those jobs suffers.
Sand and Aggregate: The Strength Builders
Sand and gravel aren’t filler in the throwaway sense. They make up the bulk of the volume, which cuts cost and shrinkage. They also carry the load. Cor-Tuf notes that aggregate materials within the concrete distribute and counterbalance applied load, and that proportioning cement, sand, and aggregates correctly produces stronger concrete.
Fine sand fills the gaps between the coarser stones. Chunky gravel gives the mix its skeleton. Skip one, and you get a paste that cracks or a pile of loose rock. Keep both in the right proportion, and the load spreads evenly through the slab or post.
Water: The Activator and the Enemy
Water starts the reaction. Without it, cement stays powder. With too much, you dilute the paste and weaken everything it holds. The same water that makes concrete placeable also becomes part of the cured material, so every extra splash stays in the finished work.
Your job is balance. Add water slowly, mix, and check the consistency before you add more. A mix that looks a little stiff often pours just fine once you work it.
Concrete Mix Ratio Basics
A ratio tells you how much of each ingredient goes into the batch. You write it as three numbers separated by colons, and the order never changes: cement first, sand second, gravel last. ProbuilderCalc notes that those numbers always refer to dry ingredients by volume. So a concrete ratio of 1:2:4 means one part cement, two parts sand, and four parts gravel.
Reading Ratios Like 1:2:3 and 1:2:4
The 1:2:3 concrete mix ratio is the usual all-purpose rule in U.S. work. ConcreteCalculatorMax reports that it comes out around 3,000 psi. Here is what one batch of that concrete mix ratio holds:
- 1 part cement: the binder that holds the batch together.
- 2 parts sand: the fine filler that fills the tiny gaps between stones.
- 3 parts gravel or crushed stone: the main frame that carries the squeezing load.
Mixing concrete ratios by volume gets easy once you pick a part size. Use a bucket, a coffee can, or a shovel — just keep the same unit for every ingredient. Double every number to make a bigger batch, and the proportions still work. A 1:2:4 mix is the M15 nominal mix in IS 456, and ConcreteCalculatorMax says it usually reaches about 2,500 psi (17 MPa) at 28 days. Buy a ready-mixed bag and the label wins. Instructions differ by product, and the bag’s numbers may not match either example.
The Water-to-Cement Balance
Water needs its own number. The water-to-cement ratio compares water weight to cement weight, and the Concrete Countertop Institute calls it the biggest single effect on most properties of the finished material. A water-cement ratio of 0.4 means 40 lbs of water for every 100 lbs of cement.
| Mix Character | Water per 100 lbs Binder | Compressive Strength |
|---|---|---|
| Very stiff | 0.3 | — |
| Higher quality, specified | 0.4 | 5,600 psi |
| Normal for sidewalks and driveways | 0.6 to 0.7 | — |
| Wet and weak | 0.8 | 2,000 psi |
Global Gilson notes that about 0.35 fully hydrates the binder, yet a batch that stiff is hard to place, pack, and finish. Most mixes land between 0.40 and 0.60. Go past that range and trouble follows. Extra water bleeds to the surface, per the Concrete Countertop Institute, and leaves tiny channels behind as weak spots. Wikipedia adds that too much water causes segregation and honeycombs — gravel pockets with no hardened paste around them. Workability is the trade-off. More water raises slump and makes the batch easier to spread, but strength pays the price.
Why Ratios Drive Strength and Durability
Every number in the batch changes the finished product. A high water-cement ratio raises porosity and cuts compactness, according to a LinkedIn analysis of durability factors. Harsh substances then get in more easily, and frost resistance drops. Keep the ratio low and the paste stays dense.
Binder content matters just as much. Enough binder meets your strength and durability needs. Too much invites shrinkage. That is why correct concrete mix proportions balance both sides, and why the concrete mix proportions you pick decide how the pour ages. Get 1 part cement, 2 parts sand, and 3 parts aggregate right, and the load spreads evenly through the slab. Get 1 part cement, 2 parts sand, and 3 parts aggregate wrong, and you get cracks, dusting, or a surface that fails in a season. Shrinkage cracks let water in, and water plus freeze-thaw cycles breaks down even a strong slab.
Measuring by volume has limits, by the way. Damp sand bulks up, so a scoop count can drift. Check your cement, sand, and aggregates before you trust the pile. Adjust the water you add, not the binder, when the batch looks off. The concrete mixing ratios you choose set the mix ratio of concrete that either shrugs off weather for decades or crumbles fast.
Concrete Mix Ratios by Grade
Grades give you a shortcut. The letter M stands for Mix, and the number tells you the compressive strength in N/mm² after 28 days of curing, per Bangur Cement. So M20 means roughly 20 MPa once the pour has cured. Reading concrete mixing ratios by grade takes one glance once you know the code.
Understanding Grade Ratings [M10, M15, M20]
Here’s how the common grades line up, using figures from Bangur Cement and a LinkedIn post by Er. Aryan Dipak Raut:
| Grade | Strength | Nominal Mix Ratio | Typical Use |
|---|---|---|---|
| M10 | 10 MPa | 1:3:6 | Leveling courses, foundation pads, non-load-bearing work |
| M15 | 15 MPa | 1:2:4 | Plain concrete, flooring, pavements |
| M20 | 20 MPa | 1:1.5:3 | Slabs, beams, columns in residential buildings |
A LinkedIn post by Er. Aryan Dipak Raut charts those strength steps side by side:
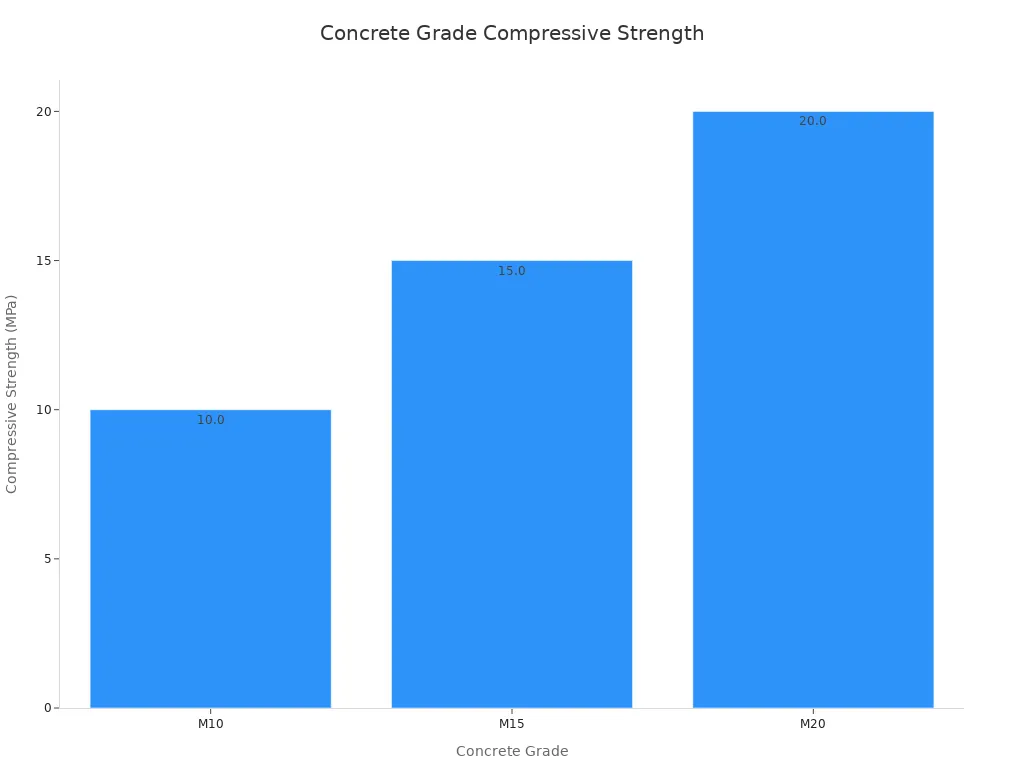
Notice the pattern. Stronger grades carry more cement and less aggregate, so the ratios shift as strength climbs. M25 pushes further to 1:1:2 for columns and heavy foundations, Bangur Cement notes. That table is your map of the concrete proportion mix for various grades of concrete.
Why 28 days? That’s the standard test age, and it’s when the mix reaches its rated strength. Until then, the concrete keeps gaining strength, so don’t load it early.
Matching Ratios to Projects [Footings, Slabs, Posts]
Match the grade to the job. Atlanta Concrete Solutions calls 1:2:3 a real workhorse for residential footings and slabs, hitting 3500–4000 PSI for slab-on-grade work that faces traffic and moisture. Their figures put 1:2:4 around 2900 PSI after 28 days — plenty for many residential and light commercial pours.
Fence posts and small pads sit fine at the lower end. Firgelli Auto suggests 1:3:6 for big block pours like footings and retaining walls, where bulk matters more than ultra-high strength. Beams and columns that carry real load want 1:1.5:3 instead. Those concrete mix proportions keep each job in its lane.
Posts are a different animal. A fence post hole needs mass and decent strength, not a structural grade. That mixing concrete ratio of 1:2:3 or 1:2:4 handles most post settings without drama.
When to Choose a Stronger Mix
Step up a grade when the load steps up. M20 is often the minimum for reinforced concrete in residential buildings, per Bangur Cement. Multi-story columns and heavy-duty foundations call for M25.
Weather and wear push you up too. A driveway or patio that takes freeze-thaw cycles and abrasion deserves more strength than a garden edging. The ideal ratio for concrete always starts with the project, not the pile.
Stronger mixes cost more and feel stickier to work, Firgelli Auto notes. So don’t overbuy strength you’ll never use. Pick the concrete mix ratio that matches the load, then spend your effort on accurate measuring.
Workability matters too. A richer concrete ratio buys strength, but it slows you down on a big pour. Balance strength against the time you have.
Determining Proportions
Nominal, Standard, and Design Mix
You’ll run into three ways to set proportions, and each one suits a different job. A nominal mix sticks to a fixed recipe from a table, like 1:2:3 or 1:2:4. You don’t test anything. You just measure and go. That works for small pours where a proven concrete mix ratio already handles the load.
A standard mix begins with those same tables but adds testing. You check the materials and make sure the batch meets a target grade. A design mix goes further. An engineer works out the concrete mix proportions for your own materials, loads, and site conditions. Big structural work usually needs that level of care. For a patio or a fence line, a nominal mix keeps things simple.
Reading Bag Instructions and Local Standards
The bag in your hand beats any table on this page. Manufacturers adjust their products for a reason, and their printed water amount and yield figures show that. Read the label before you open it. Local building codes matter too. Many areas publish their own minimum grades for footings, slabs, and structural work, and an inspector will check against those numbers, not against a blog.
When the bag and the code disagree, follow the stricter one. When you buy bulk materials, ask your supplier for the recommended concrete mixing ratio for the grade you need. A quick call saves a wasted pour.
Adjusting for Weather and Aggregate Moisture
Sand and gravel hold hidden water, and that water counts against your batch. Cemex USA calls aggregate moisture one of the most changeable and least visible variables in concrete production. Stockpiles sit below, at, or above saturated surface-dry conditions, and each state changes how much free water reaches the mix.
The numbers add up fast. Cemex USA notes that an unaccounted 0.5% rise in coarse aggregate moisture can add more than a gallon of water per cubic yard, which may shift slump by about an inch. That same gallon can cut compressive strength by about 150 to 200 psi. Wet stockpiles give up water, while dry aggregates soak up part of your mixing water, so Atlanta Concrete Solutions stresses correcting batch quantities for both moisture and absorption.
Weather drives the swing. Rain soaks the pile, heat dries the surface, and Mixer Systems points out that moisture even varies across a single stockpile. Cover your piles in wet or hot weather to hold moisture steady. Test your sand before you trust a volume scoop, then adjust the water you add. Good concrete mix proportions start with honest measurements, and proper concrete mix proportions stay honest when the weather turns. Nail the correct concrete mix proportions and the mix ratio of concrete you pour will hold up for years.
How to Mix Concrete by Hand
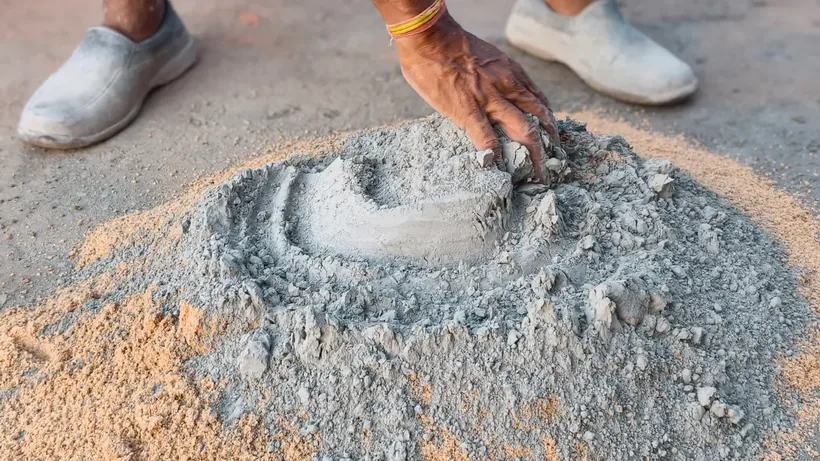
Hand mixing shines on small jobs. A patio edge, a few fence posts, a repair patch — these pours don’t justify a rented drum. Bagged mixes work fine by hand or by machine, so you can skip the equipment and still get solid results. The trick is patience and a steady hand with the water.
Tools and Preparation
Gather your gear before you open a single bag. Contractors Direct lists the basics for hand mixing concrete: two five-gallon buckets, one for the dry mix and one for the water. A wheelbarrow or wheeled container helps you move the batch once it’s ready. A mortar hoe or a ladle works for wetting the mix. Safety gear matters too — a dust mask or face shield, eye protection, and heavy-duty rubber gloves.
Set up on a flat, stable surface. Keep your water bucket within arm’s reach. Lay a tarp down if you want easy cleanup. Then follow the preparation steps from Contractors Direct: cut open the bag and empty it into your bucket, trough, mud pan, or wheelbarrow. Add measured water a little at a time, following the manufacturer’s instructions. Wet the mix gradually with your hoe or ladle, and work out any dry pockets as you go. Don’t exceed the recommended water. Scrape the edges and corners of the container instead to soak up extra moisture.
Measuring Ingredients Accurately
Accuracy starts with your part size. Pick one unit — a bucket, a can, a shovel — and use it for every ingredient. A batch of 1:2:3 means one scoop of cement, two of sand, three of gravel, all leveled off. Don’t heap the scoops. A heaped measure throws off the ratio, and the concrete pays for it later.
Water deserves the same care. Pour it into its own bucket first, so you can add it in controlled amounts. The bag label gives you the target. Follow it. If you’re mixing from scratch, aim for a stiff-but-workable consistency and add water slowly. A batch that looks dry often loosens up after a minute of mixing.
The Dry-First Mixing Process
Here’s where the mixing process earns its keep. Blend the dry ingredients before any water touches the pile. This step spreads the cement evenly through the sand and gravel, and even distribution is the heart of proper mixing.
Picture a small slab out back. You’ve got a wheelbarrow, a hoe, and a bag of mix. Dump the dry material into the barrow. Chop and fold it with the hoe until the color looks uniform — no streaks, no clumps. Now add water in small splashes. Mix, fold, and chop after each splash. Drag the hoe through the center and pull the dry edges inward. Keep going until the batch holds together and slides off the tool cleanly.
That rhythm — dry first, water slow, fold often — is how to properly mix concrete by hand. Rushing the water is the classic mistake. Once it’s in, you can’t take it out. The mixing process rewards a few extra minutes of folding. A well-blended concrete mixture feels smooth and cohesive, with no dry pockets hiding at the bottom of the barrow.
Learning how to mix concrete by hand takes one or two batches to feel natural. Start small, measure carefully, and let the batch tell you when it’s ready. Your arms will know before your eyes do.
Mixing Concrete With a Machine

A machine makes big batches much easier on your body. You still control how it turns out, though. The mixer just saves your back while you keep an eye on the consistency.
Choosing and Loading a Mixer
Choose your equipment based on how big the project is and what you need it to do. Skid Steer Solutions sorts the options into three groups:
| Mixer Type | What It Does | Best For |
|---|---|---|
| Concrete buckets | Carry and pour pre-mixed concrete; they don’t mix | Small jobs that only need moving and pouring |
| Concrete mixers | Skid steer attachments that mix and dispense on site | Larger projects with batch mixing and pouring |
| Portable drum mixers | Rotating drums, hand-operated or motorized | Small batches on smaller jobs |
Capacity, efficiency, and mixing ability all matter when you pick one. Bigger projects do better with a strong unit that handles larger amounts and keeps the mix even.
Load the drum in the right order. Put the water in first, then the dry material, and let the drum turn as you add it. Keep the batch within the drum’s rated capacity. An overloaded mixer strains the motor and mixes poorly.
Timing the Mix for Consistency
Give the drum time to do its job. Quikrete suggests mixing concrete for about 3-5 minutes, until you get a uniform, workable consistency. If the batch needs more water, add it sparingly in small amounts.
You’ll know the batch is ready by how it looks and feels. Properly mixed concrete should look like thick oatmeal and hold its shape when you squeeze it in a gloved hand, per Quikrete. Stop the drum and check before you add anything. A few extra minutes of turning beats a dry pocket hiding in the batch.
Handling and Transporting the Mix
Plan the trip from drum to form. The American Concrete Institute publishes recommended methods for measuring, mixing, transporting, and placing concrete, and it presents them as practices you should follow rather than habits to copy. Good planning and handling help you avoid delays, early stiffening and drying out, and segregation, according to a batching and handling presentation on SlideServe.
Move the concrete mixture as little as possible. Deposit it continuously, as close to its final position as you can, and keep horizontal movement short to prevent segregation. Place walls, thick slabs, and foundations in horizontal layers of even thickness, and consolidate each layer thoroughly before the next one goes down. That discipline is how to mix concrete that arrives at the form in the same shape it left the drum. Watch the batch during transport, too. A little care here keeps your perfectly mixed concrete from separating before it ever hits the ground.
What Affects the Mix Ratio
Three forces push and pull on your recipe: the load the concrete must carry, how workable the fresh mix needs to be, and the conditions it will face for decades. Change any one, and the numbers shift.
Target Strength and Load
Start with what the concrete has to hold up. Firgelli Auto lays out the trade-offs clearly:
| Mix Ratio | Target Strength / Load Condition | Typical Applications | Notes |
|---|---|---|---|
| 1:2:4 | Normal strength | Driveways, patios, general residential use | Easy to place, not overly expensive, adequate strength for most home projects |
| 1:1.5:3 | Carries real load | Beams, columns | More cement, more expensive and stickier to work, but higher strength |
| 1:3:6 | Sheer bulk matters, ultra-high strength does not | Big block pours like footings or retaining walls | Common, economical approach; easier on the cement budget and manages heat of hydration better for mass pours |
Want more strength? Bump up the cement content, Firgelli Auto advises. A mass pour that only needs bulk? A leaner mix saves money and keeps the cement budget in check. That is the whole logic behind matching a concrete mix ratio to the job.
Workability and Slump
Fresh concrete has to flow into the form and finish cleanly. The slump test measures that. Global Gilson describes the ASTM C143 and AASHTO T 119 procedure: you fill a slump cone in three equal layers, rod each one, strike the top even, then lift the cone straight up. The sample settles, and you subtract the final height from the original. Slumps of 4 to 6 inches (100 to 150mm) sit in the desirable range for typical placement, provided the water-to-cement ratio is suitable.
Several things move that number. Global Gilson notes that a water-to-cement ratio of 0.45 to 0.6 is often the sweet spot for workable concrete. Smaller aggregates need more paste to coat their surface, so they mix less easily. Angular, flaky stone is harder to place than rounded stone. Superplasticizers let a mix flow without extra water. Heat cuts workability too. Watch the shape of the slump, not just the height — a shear slump hints at segregation, and a full collapse means the batch is too wet.
Exposure and Durability
Where the concrete lives decides how tight the recipe must be. Codes assign exposure classes based on how harsh the site is, and F&R reports that mixtures must meet the most restrictive requirements in the table. Those criteria cover maximum water-cement ratio, minimum compressive strength, and air content tolerances.
Durability comes down to two moves, per F&R:
- Keep the water out.
- Make room within the concrete air-void system for freezing water to expand without damaging the concrete.
So a patio in a freeze-thaw climate needs a richer, denser mix than a shed pad in mild weather. Your concrete mix proportions should answer the site first, then the load. Get the ratios right for both, and the mix ratio of concrete you pour will hold up for years.
Mistakes to Avoid
Most failed pours come from a few bad habits. Watch out for these common mistakes when you work on concrete mix ratios, and your batch will pay you back.
Too Much Water
Adding extra water seems like a quick fix for a stiff batch. It’s not. Mikazone warns that wet concrete splits into layers, with heavy aggregates sinking while water rises to the top. That bleeding leaves the hardened concrete weak and full of holes.
The damage goes deeper than the surface. Wotaichem notes that extra water leaves empty spaces and tiny channels inside the concrete, and air, moisture, and chemicals slip through them. Rust and breakdown follow. You may also see honeycombing, rough patches, or even exposed rebar. A chalky, porous surface wears out fast and fights carbonation poorly.
Adding water without mixing again makes it worse. Soft spots form where the extra water sits, and those zones become failure points. The water-binder ratio climbs, and strength drops in a way you can measure. So water should be measured exactly, then added slowly. Stop before the batch turns soupy.
Inaccurate Measuring and Poor Blending
Careless scoops throw off the whole recipe. Unifidecst shows what happens when aggregate amounts drift:
| Condition | Effects on Concrete |
|---|---|
| Insufficient aggregate | Higher cracking risk, more shrinkage, lower strength, stickier mix that’s harder to finish |
| Excessive aggregate | More segregation, less workability, lower strength from voids, poor surface, higher permeability |
Blending matters just as much. Unifidecst describes the right order: store materials separately, discharge them, weigh each part, mix, add batch water for the target water-cement ratio, then blend everything into an even mass. Skip the weighing step and you’re guessing. Skip the blending step and you get streaks and lumps.
Mixing Too Little or Too Late
Undermixed concrete shows visible cement lumps and streaky colors, per Express Concrete. Those lumps become weak spots. Overmixing has its own cost — it breaks down the cement and lets aggregates separate, leaving a mix that’s hard to handle. Express Concrete advises mixing until the batch looks even, usually 3-5 minutes with proper equipment.
Timing counts too. Deslinc warns that placement delays cause cold joints, poor bonding, and uneven finishes. Hydration stiffens the mix and steals workability. Plan your concrete mixing so the pour runs without stopping. If delays loom, mix smaller batches or use admixtures that extend setting time. Keep the mixing process tight from first splash to final trowel.
Concrete Curing and Finishing
Finishing for a Clean Surface
Finishing begins as soon as you pour out the batch. Screeding comes first, according to MudMixer. Move a straightedge or screed board across the wet concrete to level it to grade and set the slope for drainage. Next, float the surface. A bull float pushes the coarse aggregate down early, and a magnesium float smooths it finer later. Then edge the borders while the concrete still holds its shape. That rounded edge stops chipping, according to DCPU1.
Jointing and troweling complete the job. Cut control joints at planned intervals so the slab cracks where you want it to, not where it wants to. Trowel in the final stage for a dense, smooth face, but don’t overdo it — MudMixer warns that over-troweling causes dusting or delamination. For outdoor surfaces, pull a concrete broom across the slab for traction. A1 Concrete rates broom finishes high on slip resistance, which suits driveways and sidewalks. Seal the surface after curing to block moisture and stains.
Curing Methods and Timelines
Curing is where patience beats fancy tools. Keep the surface moist for the first seven days with misting, wet burlap, or plastic sheeting, Elitesi advises. A curing compound sprayed right after finishing works too, especially on large slabs where manual moisture control is tough. Skip this step and the concrete never reaches its rated strength.
The timeline rewards you for waiting. Concrete sets in the first 24 hours, and you can walk on it after that. By day 7, most mixes hit roughly 70% of design strength, per Elitesi. Full design strength arrives around 28 days. Evenson Concrete says to hold off on passenger vehicles for at least 7 days and heavy trucks for 28. Mixing ready-mixed concrete follows a simple order: add the correct amount of water to the bucket first, then the powder, per common product instructions.
Protecting Fresh Concrete From Weather
Weather can ruin a perfect pour. The American Concrete Institute defines cold-weather concreting as air temperatures below 40°F for three days and below 50°F for more than half of any 24 hours during the protection period, per Fox Blocks. Freezing before the concrete gains enough strength can cut final strength by up to 50 percent. That’s a harsh price for one cold night.
Cover your pour with insulating blankets when temperatures drop. MI Concrete notes that hydration slows sharply below 50°F and nearly stops below 40°F, so blankets become required protection, not an option. ACI 306 and ACI 308 give the standard guidance most inspectors reference. In hot, windy weather, shade the slab and trap moisture so it doesn’t dry too fast. Watch both air and concrete temperatures during the cure. A little cover and a few days of patience protect the concrete you worked hard to mix.
Good concrete comes down to three things working together: the right ratios, smart tips, and proven techniques. None of them needs fancy tools. Accurate measuring and correct water content do more for your pour than any gadget you can buy.
So match the mix grade to your project. A patio and a fence post don’t ask for the same strength. Then cure patiently, because the first week decides how the next decades go.
Now you know how to mix concrete with confidence. Measure carefully, add water slowly, and give it time. Your first pour can look and last like professional work.
Frequently Asked Questions
What’s the easiest concrete mix ratio for a beginner?
Start with 1:2:3 — one part cement, two parts sand, three parts gravel. It’s the standard all-purpose rule in U.S. work and lands around 3,000 psi. Pick one scoop size and use it for every ingredient. Level each scoop off so the proportions stay honest.
How much water should I add?
Aim for a water-to-cement ratio between 0.40 and 0.60. That means 40 to 60 pounds of water for every 100 pounds of cement. Add water in small splashes and mix between each one. Stop before the batch turns soupy — extra water bleeds out and leaves weak channels behind.
Can I mix concrete in a wheelbarrow?
Yes. A wheelbarrow, a hoe, and two buckets handle small pours just fine. Blend the dry ingredients first until the color looks even. Then add water slowly and fold the batch with the hoe. This setup works great for a patio edge, fence posts, or a repair patch.
How long do I need to mix?
Give it 3 to 5 minutes with a drum mixer, until the batch looks uniform. Hand mixing takes a bit longer — keep folding until no dry pockets remain. Properly mixed concrete should look like thick oatmeal and hold its shape in a gloved hand.
How long before I can walk on it?
You can walk on new concrete after the first 24 hours. Keep the surface moist for seven days, though — that’s when most mixes hit roughly 70% of design strength. Full strength arrives around 28 days. Hold off on heavy trucks until then.
What happens if I pour in cold weather?
Freezing before the concrete gains enough strength can cut final strength by up to 50 percent. Hydration slows sharply below 50°F and nearly stops below 40°F. Cover your pour with insulating blankets when temperatures drop, and keep the protection in place through the cure.
Do I need a stronger mix for fence posts?
Not usually. Fence posts need mass and decent strength, not a structural grade. A 1:2:3 or 1:2:4 mix handles most post settings without drama. Save the richer mixes, like 1:1.5:3, for beams and columns that carry real load.
Why did my last batch crack?
Too much water is the usual suspect. Extra water bleeds to the surface and leaves tiny channels that become weak spots. Inaccurate scoops and poor blending cause trouble too. Measure every ingredient, blend dry first, and add water slowly. Your next pour will hold up better.